Hey Folks
Page 2 of my complete guide to photographing the northern lights. We got started on Page 1 with a discussion on where you might find the aurora borealis, and then on scouting your locations during the day. Clothing to keep you warm in the cold polar winter and the importance of a good headlamp choice round out Page 1. We’ll start this page with a look at camera gear choices and considerations.
Updated: this post was edited and updated Dec 2025
Topics
- Finding the Aurora Borealis
- Scouting
- Clothing
- Headlamps
- Camera Gear
- Photographing
- Composition
- Tips
- Discussion
- Resources
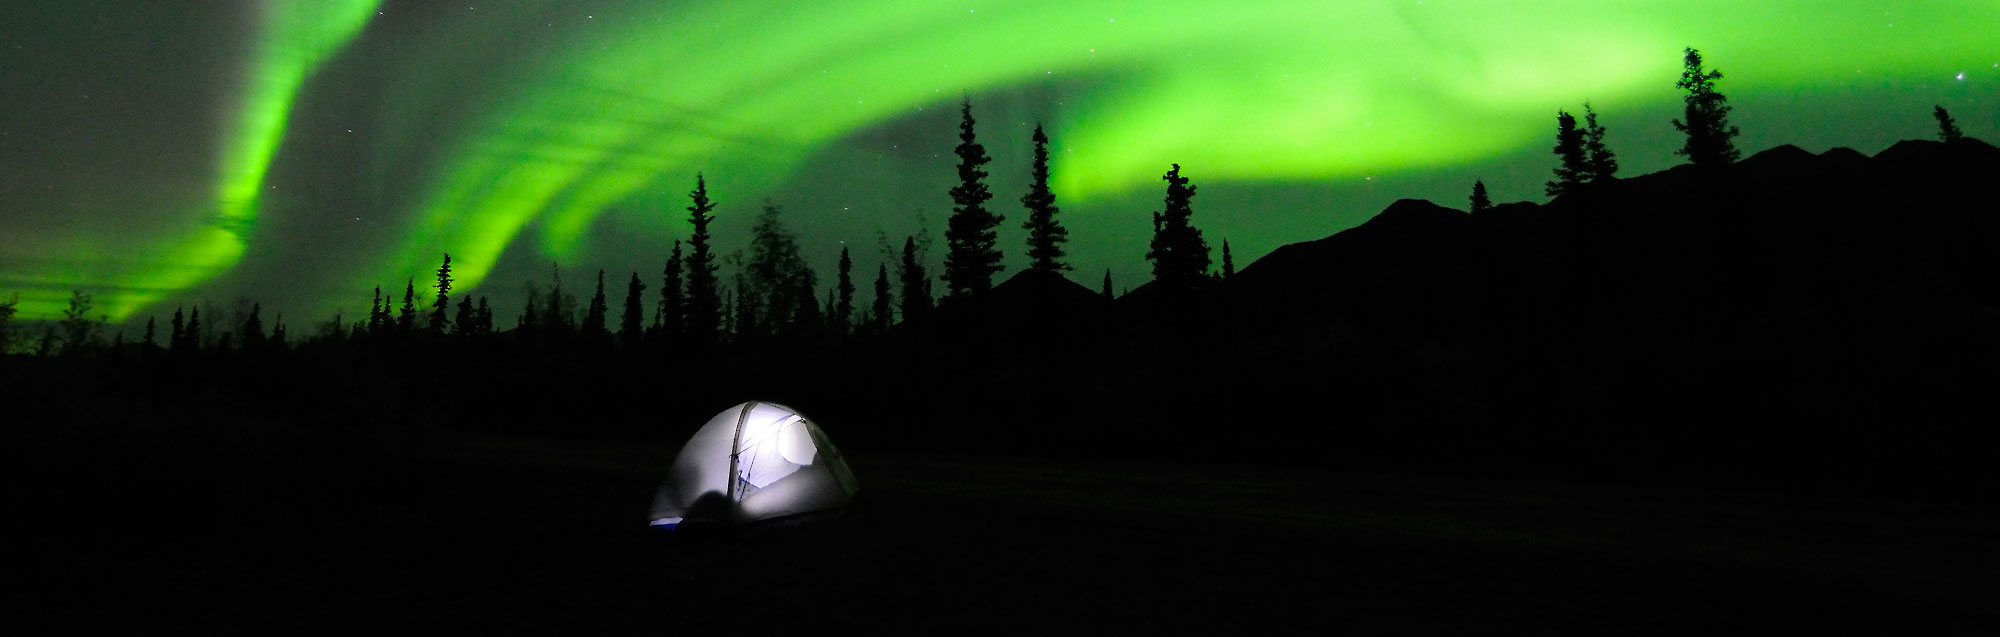
Camera equipment for northern lights photography
Shutter Speed is Everything
Shutter speed is everything. Faster is better. Yes, yes, I know, you can always get creative, try some slo-motion and long exposures and make some really neat photos. Great, but faster is still better. Try to keep your shutter speed under 30 seconds (maximum), if at all possible; I’ve had good luck with images in the 4-10 second range. I’ve shot with shutters speeds as low as 2 seconds, and high as one minute. Faster is better. You simply can’t beat shutter speed for aurora borealis, or northern lights photography.
How Do You get Higher Shutter Speeds at Night
So how do you achieve higher shutter speeds under a night sky? ISO is your friend. It may well be your best friend.
I’m comfortable with my D700 shooting at ISO 1600, but on my older, equally 12mp resolving D2x, I don’t like to go above ISO 200. (Note: These specific camera models are examples from when this was written. The principles apply to modern cameras with even better high-ISO performance.)
That’s a 3 stop difference. If we look at how this plays out in this situation, let’s imagine my D2x is shooting at ISO 200, and the shutter speed yielded is 30 seconds. I have the D700, at ISO 1600 (you are shooting the northern lights with more than one camera setup, aren’t you? You should be; more on this later) yields an equivalent exposure at 4 seconds. That’s an awfully big difference
If we factor in the long exposure Noise Reduction recommended for this kind of time frame, that 30 second exposure turns into one minute between photos, and the 4 second exposure is 8 seconds, though I could also skip NR for a 4 second exposure. This means I could shoot 15 photos with the D700, to only one image with the D2x. That’s an incredibly vast difference in number of photos alone.
It also gives me way more control over exposure, simply because I can shoot, adjust the exposure, or composition (more on this later) and shoot a corrected image, all while the D2x is still powering away on my first photo. Fleeting and active as the aurora can be, .
Why You Need a Fast Shutter Speed for Northern Lights Photography
The critical reason for a higher shutter speed though is this; the detail you will get in the resultant photos.
A longer exposure tends to yield more of a ‘sheet’ of color, which can be cool, of course, but loses all the detail of a faster frame. 10 seconds and less is where you want to be, if possible.
An additional reason is anything beyond 30 seconds, unless you’re shooting ultra, ultra wide, and the stars will begin to be recorded as miniature trails, instead of the fine sparkly dots you want them to be.
As a general rule, 25 seconds or less, with a 24mm lens, is great.
Fast Lenses Make the Difference
So, now you have your first step; jack up the ISO.
Next, you want a fast lens; an f2.8 lens is typically considered (in nature photography) to be a fast lens.
That’s 2 stops faster than a f2.8 lens, and again an immeasurable difference. Photographers to say how it’s the photographer, not the gear that matters. While I understand their point, they miss a greater point (for more on the subject – Your gear will critically impact your work).
At the very least, get a 50mm f1.8 lens, a relatively cheap lens that’s very fast and sharp. It’s not quite as wide as you’ll want, but the shutter speed will be a boon.
Wide Angle is Your Workhorse
Now you have a fast lens, you’ll really want a wide angle lens. This will be your primary northern lights workhorse lens. If you can’t afford an expensive fast wide angle zoom, like Nikon’s Herculean 14-24mm f2.8 lens, buy a 24mm f2.8 prime. It’s relatively cheap, reasonably fast, sharp, small and compact and easy to use. A great choice. A 24mm f1.4 lens is generally considered ideal.
By the way, I wouldn’t worry too much about sharpness here. Some folks worry about this, and particularly corner sharpness on the superfast wide angle lenses. Rarely is this going to be an issue, imo; you’re not shooting enough detail in the image to be overly concerned about this. Most any decent 2.8 lens or faster will be just dandy.
Note also that these lenses all become ‘less wide’ on many digital SLR cameras, the infamous DX bodies; If you shoot a ‘crop factor’ body, you’ll most likely want a wider lens. You’ll also want a faster lens, as most of those bodies don’t have the extreme high ISO quality of the full frame or FX bodies.
In brief, you want a fast wide angle lens, as well as possibly a midrange zoom; 28-70mm is a great range. You’ll want to be able to shoot at higher ISO’s, so whatever camera you can manage that provides a high quality, high ISO option is the choice here.
Tripod & Ballhead Requirements
Next, . You can’t handhold this stuff. And you can’t “make do” with resting the camera on a rock or backpack or whatever other workaround we squeeze out when in the field.
Make sure they’re both cleaned and functioning at absolute optimum performance; cold weather does weird things to equipment, and if you’re fussing with the tripod at home, it’ll be impossible to manage in the cold night air. Any water in your tripod, if you’ve been shooting elsewhere, will freeze up and the tripod will be next to impossible to manage. Factor in how cold your hands will be, and you’ll be in tears of frustration, pain, cold and loneliness (no one else will wait around and hang out if they have to put up with this). 🙂 So clean, dry and re-grease your tripod you leave home.
Cable Release & Accessories
Bring a cable release.
I generally don’t shoot with mine when I’m photographing the aurora borealis, but that’s because (a) Nikon’s screw-in cable release mechanism completely sucks, and (b) with shutter speeds in the 4-30 second range, I don’t really need one.
But if I need or want to shoot a longer exposure, then a cable release is a must have. So have it handy. Be prepared though; that lovely pliable cable release you own will become one stiff, expensive and very brittle (in other words, breakable) cable in arctic temperatures. So be careful with it and carry a spare if possible (keep it your vehicle).
Filters: Remove Them All
Without going into all the technical details, the northern lights and filters don’t jive, so remove filter from your lens. Northern lights photography is not done with a UV filter on your lens. Or any other filter.
Batteries & Memory Cards
Bring extra batteries and CF cards, and keep them in an inside pocket of your puffy down jacket.
Remember, supreme cold eats batteries, even the magical hundred forty dollar Nikon batteries; I bring 2 extra. I’ve never had an issue with CF cards failing, but I know some folks who have, so I highly recommend the SanDisk “Extreme” series cards if you’re shooting in cold temperatures; at the very least, have a few of those along.
( it’s not likely to be that kind of crazy cold temperature if you’re shooting the Alaskan aurora borealis in September; even in October that would be unlikely. But tonight it’s mid November, and the temperatures across interior Alaska are in the -20 to -40 and colder range, so stand warned).
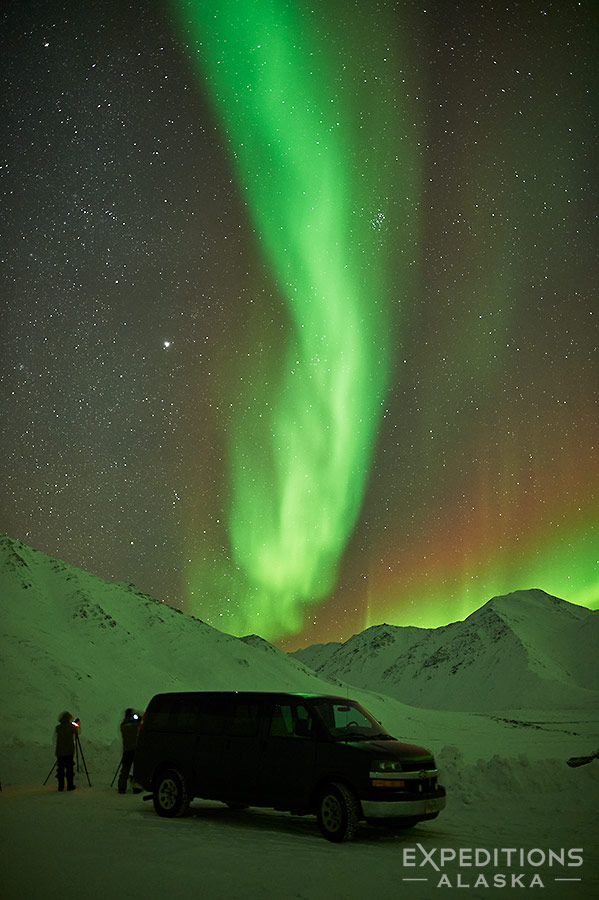
The Two-Camera Setup
My final note on camera gear (and this one I’ve not seen anyone else mention in similar articles around the web).
Shoot with 2 cameras, 2 tripods, 2 ballheads, etc.
Aurora borealis photography is not about perfect mobility in the field, so it’s the perfect time to try your hand with a 2 camera setup. I’ll set up 2 tripods and cameras, and shoot with both. I can have an ultra wide lens on one body, say 14mm, and simultaneously shoot with a 24mm, or 28-70mm or 50mm on the 2nd body.
It takes a little practice, but there’s simply no reason not to try this. (Note: Well, I’ve now season more than a few reasons. If you’re really struggling getting this process together and aren’t familiar with your gear, shooting at night, and staying warm, then I’ll backpeddle a bit here .. Keep it simple. Simple wins.
We can’t predict what the next display or burst of the aurora might be, so we’re always guessing and shooting. More options are generally going to be helpful. So get out both your cameras, and practice shooting with both together. You can try some long exposures with that backup body you carry about with you, while your main body is firing away every 8 seconds.
Photographing
This section is to offer some input on issues when photographing the northern lights you’ll likely run into that you might normally not experience. One thing I’ve learned over the years is that all the experience we gain is really only helpful when we’re doing things we’ve done before. But even the most “experienced” people around will look like that fish out of water when thrown into a new field. So be ready to struggle a bit.
Focusing is critical, and difficult. Your autofocus will likely not work at all in the dark night air. So find a way to find infinity on your lens. It’s not where any rational sane, thinking person might think when viewing their lens focus display. So practice in advance, and learn exactly where the lens needs to be set to focus at infinity.
Why infinity? Because the aurora is far, far away. Even at f1.4, you’ll focus at infinity, and have the entire image in focus. Missing focus sucks. I’ve tossed away some of my best and favorite northern lights images because I hadn’t focused correctly; it doesn’t matter that the aurora activity peaked right then, firing off the greatest display I’ve ever seen. I caught the whole spectacle (perfectly exposed, I’ll proudly add), and wonderfully composed – and to this day my photo is out of focus.
Focusing Options
Options to help focus correctly? None are foolproof, but one option is to use Live View, if your camera has that feature, and zoom the display all the way in. Another is to focus on the moon, if it’s out. Your camera focus point should be able to find the moon at night and focus accurately. Check it though. If your lens didn’t focus to infinity on the moon, try it again. Or, return to planet earth with the rest of us. 😀
If the moon isn’t out, turn your headlamp on to its brightest setting and see if that provides enough light for your lens to focus on something at infinity (a 24mm at f2.8 will be at infinity focus on a subject only less than 25 feet away). If your headlamp doesn’t throw enough light, use your vehicle’s headlights. If your vehicle does not throw enough light for your lens to focus, please don’t drive at night. 🙂 Seriously though, there’s almost always some way you can find to get the camera to autofocus. Failing that, manually focus and take some test shots. It’s a down and dirty workaround, but it works.
Another option I’ve heard discussed is to use the hyperfocal distance setting for your lens. At f2.8 and a 24mm lens, on a full frame camera body, that’s just over 22′; everything from approximately 12′ out to infinity will be sharp. For a lens like the 24mm f1.4, finding infinity focus, especially in the dark, is even trickier, and some folks suggest using your hyperfocal distance of 44′ at f1.4, then maybe even stopping down to f2.0, just to provide some cushion. I haven’t had much luck with this, because of the way the focal scales work on wide angles lenses. My 24mm lens has no way to focus (using the distance scale) at anything much beyond 10′, then it hits infinity. I doubt this is a good option.
You could always guess it, and try to manually focus on some object 44′ away. Good luck with that, in the dark. The deep snow you’re standing in will make pacing that distance out a real joy, and any other photographers in the area will just love watching you track up all that fresh unmarked powder snow in the foreground of their compositions.
Locking Your Focus
Once you’ve found infinity, tape the lens barrel so the focusing ring doesn’t move. Some folks mark exactly which point on the ring is infinity, but this can vary a little with temperature. Lenses, like anything else, get weird in cold weather. So don’t try to preset focus and tape it in sunny Florida before you head to the arctic for your aurora borealis photo trip.
So now you’re ready to shoot. Your camera is tripod mounted, you’re standing at the overlook you carefully scouted earlier that day, the lens is wide open and glued to infinity, and you notice the beginnings of an eery glow in the dark night sky.
Crank your ISO as high as it might go. ISO 6400 is fine, for example, or higher. Turn Noise Reduction . Shoot a nice long 30 second exposure (or similar depending on moonlight) and check the LCD (assuming the subarctic freezing air hasn’t turned your LCD, “Liquid Crystal Display”, into a No-Longer-Liquid Crystal Display). Check your composition and your focus here. Make sure the horizon is what you want, make sure the framing and balance of the shot is in the ballpark. You’re not checking exposure here, just the composition and focus. Deal with exposure later. Make adjustments to the framing and focus as needed.
Now you’ve got your composition framed, best you can in advance, and the aurora is starting to kick. Drop your ISO back down to a ballpark that works for your camera, lens and own preferences. I’d suggest ISO 800 is a minimum, but I’ve definitely photographed the aurora borealis at ISO 400 before, even as low as 200. It’ll depend on so many different factors, all I can offer here are some basic starting points. Measure out an exposure; whether you use manual settings or an auto-setting is up to you. I shoot on manual settings, but Aperture Priority, with Exposure Compensation, works too if that’s your gig. You’ll want control over the aperture, so I would NOT recommend Shutter Priority or full Auto.
Try a ballpark exposure, equivalent to f2.8 at 15 seconds (remember, Noise Reduction still off at this point). Now it’s time to closely review that histogram and adjust the shutter speed, and/or ISO, to get the best exposure you can. I definitely believe in slightly over-exposing the image a little, if possible, most of the time for aurora borealis photos. I can pull it back down in my RAW converter later, and that little extra exposure helps keep the file cleaner; i.e., less noisy. But it’s always a tradeoff with shutter speed, so I’ll make that call as it happens.
For your Image Quality setting, I (strongly) suggest shooting RAW, even if you usually shoot jpegs, but do what works best for you and your workflow. That means you should weigh any advice you read or receive against what you’re most comfortable with. Fiddling with this stuff, if you’re not used to it, is best done when you should be shooting.
If my exposures are longer than 4-8 seconds, I might turn on long exposure Noise Reduction, but that will be dictated by the camera I’m using, what the northern lights are doing, etc. I’d rather a noisy photo of an awesome display than no photo at all. Personal preference and all that stuff, I guess. 😊
I leave the White Balance control set to Auto for northern lights photography. I can play with it later in the RAW converter, but rarely do I ever have to. I like to keep it simple, in both pre and post-shutter work. Noise Reduction programs like Noise Ninja, etc, can be helpful, but that’s beyond what I’m here to write about today. A good exposure, a well composed photo, some patience, and a whole lot of luck go a long way to giving me the photo I want.
Exposure is Contextual
In review: I shoot RAW files, auto WB, manual exposure mode, and then alter exposure based on the RGB histogram. Some experts like to offer a ballpark idea exposure in their guides, but in my experience, it’s completely contextual; exposure depends completely on ambient light and aurora intensity, and so varies enormously. I’ll offer 2 sample exposures to make my point:
I’ve photographed the northern lights, exposed correctly, at
- ISO1200, f2.8 2 seconds. And
- ISO2500, f2.8 and 30secs.
so ….. Don’t worry about what your “How to Photograph the Northern Lights Cheatsheet” says
PS: I have now edited a copy of this entire 3-part article, updated it, added a ton more photos, and generally made it way cooler, PLUS made it available as a free downloadable eBook. You can access a downloadable pdf or an iBooks version here