Hey Folks,
One of the more challenging aspects of a remote Alaskan backpacking trips is river crossings. With the exception of the occasional Kenai Peninsula hike, all of these treks are off-trail, wilderness backpacking trips, and so there’s no easy way to get across the streams, creeks and rivers that meander through the mountains. A few tips that can be useful to heed:
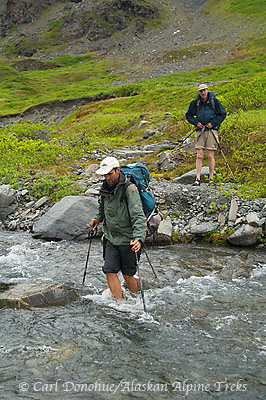
1) For smaller streams, I prefer to cross one person at a time. If by chance someone in the group does stumble, it means we have one wet person to deal with. Everyone else in the group is safe and secure on shore. Things unravel quickly in the backcountry, and that happens most often when something small goes wrong. One person stumbles, takes a dip, someone else reaches to grab them, they go down, knock their partner off balance, and all of a sudden bedlam results. That’s how people get hurt. It can also mean everyone gets wet gear. A much simpler problem to deal with is getting one person out of a creek, drying them off, and loaning them some warm, dry gear that another person in the group has in their pack. One person falling is a hassle – a group falling can be a disaster.
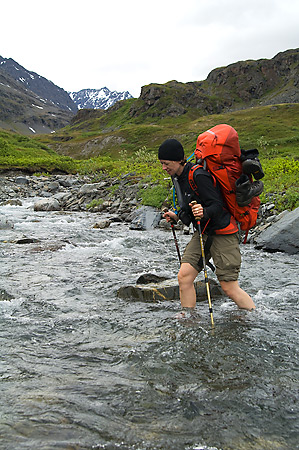
2) For anything over knee-high, unbuckle your hip belt and sternum strap on the backpack. Often these creeks and streams are fast, and the power of rushing water can be hard to struggle against. Compound that with the silt and glacial silt that is typically in the rivers here, and your backpack can become a led weight before you know it. What seems like a manageable load on your back is not so manageable if you’re upside-down in a rushing stream, and the backpack getting heavier by the second. Worse still, lying facedown in a rushing stream is the time to try to undo your hipbelt and and get your pack off your back. Undo those buckles you get in the water (see the photo above).
Similarly, rain covers go on the backpack before crossing. If you lose your balance and tumble, that small procedure can keep a whole bunch of your gear dry. If the river looks a little more gnarly, dry bag your food, your sleeping bag and insulating gear as well — the old adage “a stitch in time” means something here.
3) Take some time to look around for a good crossing place. Often creeks and rivers that might be waist deep become braided and shallower right around the corner. I’ll spend 20 minutes at times walking upstream or downstream or both looking for a good crossing spot. It’s too easy to feel rushed, and just say ‘well, this place is as good as any’. The chances are very high that this place is as good as any. Slow down, take some time out, and look for the best place to cross. Walk along the shore, and check the lay of the land before you arrive at the creekbank; oftentimes you’ll see a good spot to cross from a distance, and change your approach to arrive at the better spot.
And a good spot to cross means more than shallow water. It means a good easy entry into the water, a nice easy exit, not a steep, wet rock, or wall of brush, or means ‘good water’ downstream in case someone swims. You don’t want any ‘strainers’ in the creek, submerged or partially submerged brush that can easily hold a swimmer under water.
4) Don’t be afraid to drop your pack off, and have the strongest hiker (and swimmer) in your group test the depth and feel of the water without a backpack on. These glacial melt waters can be absolutely impossible to gauge depth visually, so you’ll need to wade in. Use your hiking poles (you carrying hiking poles, right?) and test the depth ahead of you as you go.
5) Watch carefully for holes – it’s easy to be caught, thinking ‘this isn’t too deep’ and have the ground suddenly drop away beneath your feet. Fast rivers and creeks can easily dislodge a boulder or similar and leave a big hole on the riverbed that you won’t see, but will disappear under when you step into it.
6) I prefer to cross in sandals, tennis shoes, crocs, or similar, and keep my hiking boots (and socks) dry. Don’t cross in bare feet. If you wear crocs, add some security by tying them on. In a fast creek they’ll easily wash off your feet when you raise your foot. But, with reasonable precautions, they do make great creek crossing footwear. Or try the Trailbreak – a more sturdy version of the croc. Do NOT carry your boots in your hand – that’s a disaster waiting to happen. Tie them securely on to your backpack, not over your shoulder, etc.

7) For rushing deeper rivers, I find crossing in couples or trios works well. More people gets a little unwieldy and the group moves too slow. These rivers are Have 2 people together, the stronger on on the upstream side, using 2 trekking poles and locking elbows/wrists is a good idea. For 3 people, I prefer the ‘triangle’, with the stronger person again on the upstream side. Some folks like to form a circle, and cross with all hikers facing one another; whatever method you do, undo your backpack buckles, and practice the movements a bit before you enter the stream. Even a quick 30 second practice on land can make a big difference.
8) Wait til morning. Typically, these rivers and creeks subside over night, as they’re glacial fed, which means the water levels drop when temperatures cool down. Set up camp somewhere nearby, make an early start, and cross before the heat of day lifts the water to more dangerous levels.
9) Go back. River crossings can be dangerous. If you (or someone in the group) are uncomfortable with the crossing, go back. It’s simply not worth it. You’re in Alaska – your trip doesn’t hinge on being on the other side of some river. There’s plenty of cool stuff to see and visit on this side of the river.
10) Face slightly upstream. Don’t “force” the crossing, but move with the current, tread carefully, and feel for good footing. Be careful. Take small steps and keep your center of gravity close. You’ll see some bad form in the video below, with one hiker reaching with his poles and taking larger, unstable steps. That’s a good way to take a swim.
I prefer to have someone in the group on shore at all times. I don’t like everyone in the water at one time, on any crossing. If somebody stumbles and needs assistance, the people crossing are the best choice to help, in most cases. 9 times out of 10 that kind of thing means more people falling and stumbling. Get yourself safe, and keep the ‘victim‘ number low. The person on shore can more easily maneuver into position to provide assistance to swimmers. The person on shore should have their pack off, means even if they fall and get wet, their gear is dry. Dry gear in Alaska can save your behind!
I also don’t like ropes. Ropes and water don’t mix well. Ropes and water and brush and rocks and inexperience hikers mix generally very badly.
Watch the video below; you’ll see the trekking poles used, and also how slowly to cross. You can see we found, in the first one, a nice wide braid of the river to cross; we hiked alongside this river for nearly 1/2 mile before we arrived at this spot. In the 2nd, take note of the location again. Downstream is a nice shallower braided section. Also note that by carefully choosing where we start crossing, we have an easy entry, shallow water, no brush, etc, then one deeper channel, followed by a nice shallow exit. You don’t want to be waist deep in a flowing stream and have a wall of brush meet you at your exit point.
You’ll also notice I cross ahead of the 2 backpackers here, without a pack, and run a guide line for them to follow – they see where I went, and know to follow my line. Once I set off, I cross and stand on shore. Hypothermia sets in fast in water that’s barely above freezing – this crossing is about 1/4 mile downstream from the glacier that feeds the river. I’m on shore safe, slightly downstream of the hikers, where I can be of use if one stumbles. You’ll also see, as the 2nd hiker exits, the easy exit point, as well as the lack of any real threatening spots downstream. If someone tumbles, there’s no immediate rapid or hole they might get caught in just below our crossing spot.
Be safe out there.
Cheers
Carl
River Crossings from Expeditions Alaska on Vimeo.


