Guiding Backpackers Across Alaska’s Glacial Rivers
River Crossings on Our Backpacking Trips: Judgment, Not Protocol
River crossings are one of the most serious hazards on any Alaska backpacking trip. Glacial rivers are cold, silty, and unpredictable, and they show up on many of the routes we guide. The Southern Traverse, the Seven Pass Route, the Goat Trail, Adventures in Oz; all of these off-trail backpacking trips involve crossing water that demands respect.
After 25 years of leading backpacking trips and through Alaska’s backcountry, we’ve developed a simple philosophy about rivers: there’s no formula that works every time. Every crossing requires judgment based on the conditions right in front of you. That judgment is one of the biggest reasons people choose to travel with experienced Alaska backpacking guides rather than figuring it out alone.
Here’s how we think about it, and what we teach our guests along the way.
Understanding Glacial Rivers
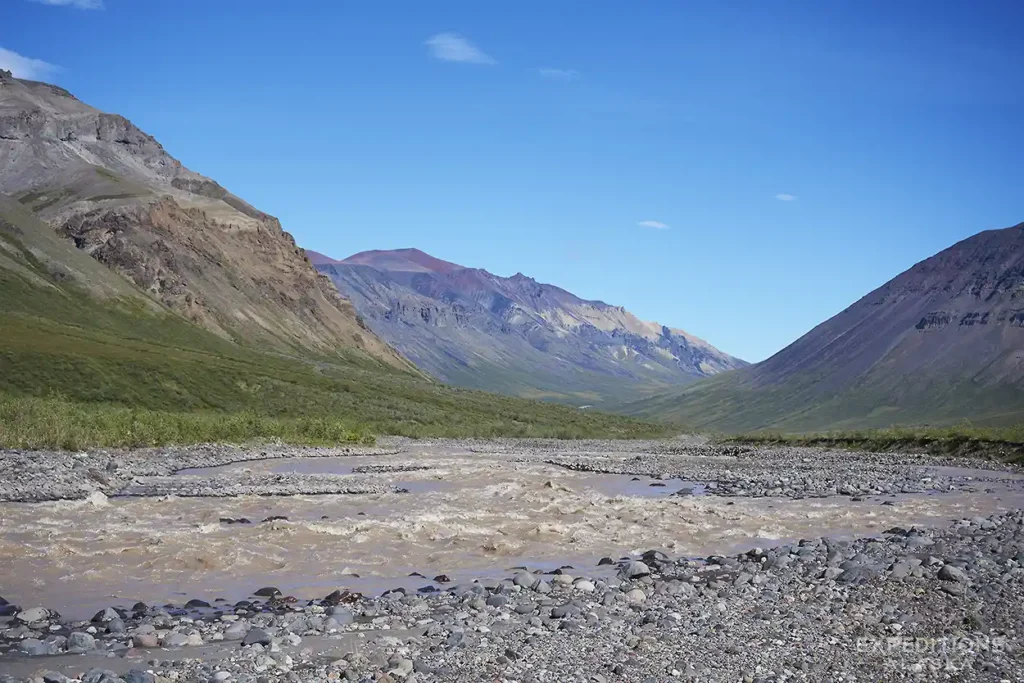
In the National Parks where we guide (Wrangell-St. Elias, Denali, Lake Clark, Gates of the Arctic), rivers aren’t like the streams you might know from the Lower 48.
Cold. Glacial melt means water temperatures near freezing, even in July. You can’t feel the bottom through your boots. Your feet can go numb in minutes. This affects your balance and your ability to react if things go wrong.
Silty. Glacial flour suspends in the water and makes it opaque. You can’t see the bottom. You can’t see your feet. You can’t assess substrate or depth by looking. You’re crossing blind.
Variable. Flow can double between morning and afternoon as the day’s melt pulse moves downstream. A river that was knee-deep and manageable at 7 a.m. can be thigh-deep and dangerous by 2 p.m. What you crossed yesterday might not be crossable today.
Scout it
Scout it. Scout it. Scout it.
Walk up the river’s shoreline. Have someone in the group walk the opposite direction and scout what it looks like that way.
I’ve been guiding trips where I, or the whole group, walked miles up and down rivers before looking for a place to cross that held lower risk. That’s actual miles, not the colloquial “kinda a ways”.
Miles.
And if the river looks dodgy, at all, so should you.
Preparation is your friend. The military have a phrase, “Time spent in reconnaissance is seldom wasted”.
Good advice. It’s one of the first things we teach on our backpacking trips. New guests are sometimes surprised when the guide walks a mile upstream before anyone gets their feet wet. But that mile of scouting is what keeps river crossings routine instead of dangerous.
You can change the depth of the river by finding a location with more braids. Braids are sections of the main river that split into smaller volumes. Often you can find a place where a steep, deep river splits into three different sections or braids. This is usually a much better place to cross than taking on the river in its full volume in one channel.
Assessment: What to Look For
Managing glacial crossings in the Alaska bush is about preserving your margin of safety.
A singular, deep channel offers zero redundancy. A slip, and the river wins.
Mitigate this by seeking out braided reaches. You don’t beat an Alaskan river with strength; you beat it with morphology. Find the braids.
Crossing three braids of 30% volume is infinitely safer than tackling 100% of the flow in one slot. If the main channel looks marginal, stay on the bank and keep scouting.
We are looking for those deposition zones where the river loses its focus and spreads out.
Remember: a mile of extra hiking to find a braided crossing is a cheap price to pay for a dry team and a zero-incident day. On a guided backpacking trip, that decision is the guide’s to make, and we’ll always take the extra mile.
Look Before You Leap
Before anyone enters the water, assess the crossing. Look at the following.
Entry and exit points
You need solid footing on both sides. A good entry with a bad exit puts you in trouble halfway across with no safe option. Scout the far bank carefully.
Super easy to ignore this. Most people do. Your exit point is critical. Don’t get into the river without having 2 good exit points in mind.
Depth.
Knee-deep is manageable for most people. Thigh-deep is generally the upper limit for crossing safely. Waist-deep is dangerous. If the current is strong and the water is above mid-thigh on your shortest group member, don’t cross.
Current strength
Depth matters, but current strength matters more. Knee-deep water with heavy current can knock you down. Gauge the speed of the water and the force it’s exerting. Watch debris moving downstream.
Substrate
You can’t see it, but you can sometimes infer it. Bedrock is slick. Cobbles are unstable and shift underfoot. Gravel is best. If people ahead of you are struggling to keep footing, the substrate isn’t good.
Downstream hazards
What happens if someone falls? Is there a calm eddy 50 yards down where they’ll wash up, or a logjam that will trap them? Is there a waterfall a quarter mile below? Know what’s at stake.
Hazards coming downstream
Large rivers can move boulders, logs, ice chunks. Pay attention to what’s coming at you from upstream. If debris is actively moving, wait.
Glacial Rivers Will Lie to You
Guiding an exploratory route, I tried to cross this river 3 times, and turned back each time. I’ve crossed a of glacial rivers, and like to think I have good judgement on depth and flow just by “eyeballing it”.
Stripped to my boxers, not 5 yards into the water and it was over waist deep, way fast, and super cold.
Much deeper than I expected.
Crossing something like this in the front country would be a bad decision. In a remote fly-in and fly-out location, it would’ve been a very poor decision.
How We Get Across
Crossing Methods
This is where guiding experience matters most. There’s no single “best” way to cross a river. The method depends on the water, the group, and the experience level of everyone involved. On our backpacking trips here in Alaska, we match the crossing method to the conditions and the people we’re with that day.
Solo (one at a time). One person crosses while everyone else watches from shore. If they get in trouble, the group can respond. We use this for difficult crossings, less experienced groups, or any situation where there’s uncertainty. It’s the slowest method but it’s the safest, and we default to it when conditions are marginal. Your guide will lead you.
Pairs (side-by-side). Two people lock arms or hold onto each other’s pack straps and cross together. Provides mutual support and stability. Works well for moderate conditions with experienced hikers.
Pyramid (trio). Three people form a wedge facing upstream. The strongest person is at the point, breaking the current for the other two. The group shuffles across together. This works for experienced groups in moderately difficult water.
Larger groups. Only for extreme circumstances with very experienced groups. More people doesn’t always mean more safety. It means more complexity and more things that can go wrong.
Use the simplest method that’s appropriate for the conditions. Don’t overcomplicate.
Walk Around It
Not something you’re likely to do in the Lower 48. But I’ve walked “Around” numerous rivers here. head upstream and find the toe of the glacier that the river stems from. If you can, get on to the moraine or the ice, cross on that, hop off the other side, and walk back down the opposite side of the river.
One of these detours took us almost an extra day of walking, including some difficult moraine walking. But we were safe and sound, and nobody got hurt or got their feet wet. Win-Win!
Safety first.
This is something that happens on trips like the Southern Traverse and the Wrangell Ramble, where glacier-fed rivers are part of the landscape. Our guides know the drainages and have backup routes in mind before the trip even starts. Sometimes the best crossing is no crossing at all.
Equipment and Technique
I know I just said above there is no one way to cross glacial rivers. Let me reserve the right to be slightly inconsistent here. It’s a good idea to test a river first. Without your backpack.
Have someone ready to help you downstream also without a backpack on. This allows you to gather information about the crossing with much less risk. On our guided trips, the guide crosses first to assess depth, current, and footing before anyone else enters the water.
An ounce of prevention, and all that.
Trekking poles. Mandatory. Not optional. A pole upstream gives you three points of contact and significantly improves stability. If you don’t have poles, find a stout stick.
Footwear. Critical. Do not cross barefoot. Do not cross in flip-flops. River sandals, camp shoes like Crocs (must be strapped or tied on, not loose), or your hiking boots all work. You need protection and traction. Numb feet on slick rocks without footwear is a recipe for disaster.
Pants off. Don’t be afraid to take your pants off before crossing. Wet pants create drag and take forever to dry. You’re going to get wet either way. Minimize it.
Unbuckle your pack. Hip belt unbuckled, sternum strap unbuckled. If you go down, you need to be able to ditch the pack instantly. A pack full of gear will drag you under and pin you to the bottom. Keep your shoulder straps on but be ready to shrug out of them.
Pack covers off. A pack cover becomes a catchment if you do take a swim. Remove it. Struggling with a pack we can’t lift is a common situation people needlessly put themselves in. Don’t do that.
Face upstream. You want to see what’s coming and brace against the current. Sideways works for pairs and trios. I don’t face downstream.
Move deliberately. Don’t rush. Small steps. Shuffle your feet rather than lifting them high. Feel for solid footing before committing your weight. The current will try to sweep your foot downstream as you move it. Anticipate this.
Timing Matters
Cross in the morning. Glacial melt peaks in the afternoon. Water that’s knee-deep at 7 a.m. might be thigh-deep by 2 p.m. Get across early if you can.
Wait if necessary. If the river is too high, wait. Maybe it drops overnight. Maybe it drops in a day or two as weather cools. Waiting is not failure. Waiting is good judgment.
Turn around if necessary. Sometimes the river doesn’t drop. Sometimes conditions get worse. If a crossing isn’t safe and waiting doesn’t help, turn around. Hike out. Find an alternative route. “Don’t cross” is a valid answer.
When NOT to Cross
If you’re struggling at thigh-deep. If the current is pushing hard and you’re fighting to stay upright at mid-thigh depth, don’t go deeper. The force increases exponentially with depth. What feels barely manageable at thigh-deep becomes impossible at waist-deep.
If you can’t see downstream. Fog, rain, poor visibility. A couple of bends in the river. If you can’t assess what’s below you, don’t cross. You need to know where someone will end up if they wash downstream.
If the water is rising. If the river is visibly rising while you’re scouting, don’t cross. Conditions are getting worse, not better.
If the group isn’t confident. If people are scared, hesitant, or expressing serious doubts, listen. Fear is information. A frightened person in the middle of a river makes bad decisions. Address the fear on shore or don’t cross.
“Mandatory” Crossings
Sometimes a crossing is described as mandatory. That means there’s no way around it if you want to complete the route. It doesn’t mean you have to cross it. It means if you can’t cross it, you can’t continue.
Evaluate mandatory crossings with the same judgment as any other. The fact that a crossing is necessary for the route doesn’t make it safe. If conditions are bad, you turn around. The river doesn’t care about your itinerary. Routes like the Seven Pass and the Goat Trail both have crossings that can become impassable in high water. We plan for this. Alternative camps, flexible timelines, backup routes. It’s part of the trip design, not an afterthought.
Context Over Formula
Every crossing is different. Water height, current speed, substrate, group experience, weather, time of day, what’s downstream. All of it matters. There’s no checklist that tells you “go” or “no-go”. You assess the situation in front of you and make a call.
If you’re uncomfortable, don’t cross. If the guide says don’t cross, don’t cross. If conditions change halfway through and it’s not working, retreat to the bank you came from (or the nearest bank).
The river will still be there tomorrow. You might have other options. You definitely have the option to turn around. Use it when you need to.
This is what backpacking guiding in Alaska looks like. Not a checklist. Not a protocol. Reading the water, reading the group, and making the right call. It’s the kind of judgment that comes from decades spent in these drainages, and it’s the kind of thing that’s hard to learn from a book.
Summary
- Cross early (7am-8am)
- Wear the right footwear and clothing
- Take your time to evaluate the crossing. Don’t rush it
- Don’t cross unless you are 100% sure it will work
- You can walk around the whole river by hiking up valley in some cases (might take a full day)
- Have a worst case scenario plan
- Use your human resources.
River crossings are one of the things that separate Alaska backpacking from anything else in the Lower 48. They’re also one of the biggest reasons our guests tell us they were glad to have a guide along. If you’re thinking about a backcountry trip in Alaska and want experienced guides who know these rivers, take a look at our Alaska backpacking trips and see which route fits.
Be safe out there.
This information is based on standard backcountry travel protocols and the operating procedures used by Expeditions Alaska on trips in fast & cold water everywhere.