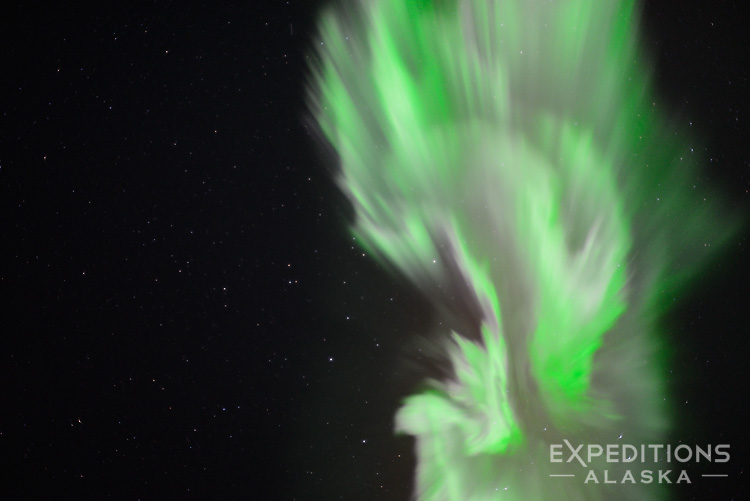
The aurora borealis corona, or Coronal Aurora borealis – directly overhead, photographed with a 50mm f1.4 lens. ISO 2000, aperture 1.4, s/s 1/3 sec. Click on the image above to view a larger version of this photo.
“Oooh, my little pretty one, pretty one, When ya gunna give me some, My Corona”
Hey Folks,
What a cool tune, eh?
This image of the aurora borealis corona was taken last March on one of the aurora borealis tours.
Here’s to hoping we get a night like this one again. Absolutely incredible evening, and it went on and on and on and on …. all night long. I think we got home at something like 9am this morning. I remember we nearly missed breakfast at the hotel because they were closing it up when we rocked into town.
Winter in Alaska is a fun time; it’s a hard time for a photographer because we have to choose between shooting during the day time, and waiting out the nights to photograph the northern lights. And then switching schedules back and forth as the weather and the northern lights predictions change.
So the last few nights I’ve spent mostly sitting around at night hoping to be in the right place at the right time. For the most part, instead I’ve been in the wrong place at the wrong time.
Shooting the northern lights is harder than most folks expect; shooting the northern lights with very specific compositions and scenes is even harder, because everything has to be just right. There are a few areas I have in mind for some northern lights images over the Wrangell Mountains, and so far, I’ve not gotten close. Every night the potential has been there, I’ve ventured out, only to be skunked. And few places can really skunk a photographer like Alaska can.
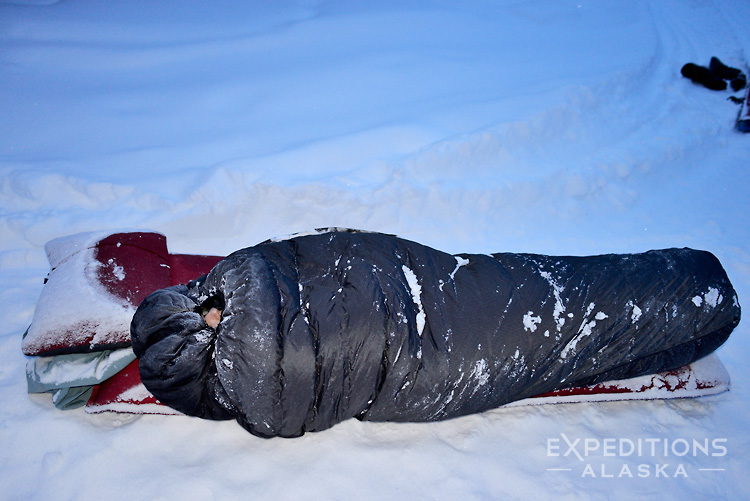
Sleeping in a winter sleeping bag on snow in Alaska in January, a camper is tucked up and bundled up tight in his down sleeping bag. Mountain Hardwear Ghost sleeping bag, Exped Sim Comfort 10 LW. Wrangell-St. Elias National Park and Preserve, Alaska. Please click on the image above to view a larger version of this photo.
Hey Folks,
It’s January, and Alaska snowshoe and ski trips can be a rough place to sleep outside during this time of year. Temperatures can easily be down below zero F, even into the minus 30’s and 40’s, or colder. So sleeping outside is not to be taken lightly.
Alaska Winter Camping – Sleeping Warm
Bring MORE sleeping bag than you think you need—go 20 degrees below predicted temps
Your sleeping pad matters as much as your bag. Get an insulated one, minimum 1″ thick
Your bag doesn’t generate heat. It only traps what your body makes. Go to bed warm
Sleep hunkered down all the way. Zip it up, velcro it closed, leave minimal space for your face
If you have to pee, go pee. Holding it makes you colder
Choosing Your Winter Sleeping Bag
Bring a good sleeping bag. A REALLY good sleeping bag. If you predict temperatures of zero (F), I’d go with a sleeping bag rated to minus 20 degrees F.
I prefer a down sleeping bag over synthetic bags, but the key is a high quality, and well rated bag. If you have a good synthetic fill sleeping bag, use that. It’ll be heavier, and less compatible, but you can deal with that. You don’t want to have to deal with being cold.
Your bag is your last refuge against the cold. Don’t skimp on it. Bring “more” sleeping bag than you think you need. I do like the goretex or similar shells for winter bags, and highly recommend them.
The Critical Role of Sleeping Pads
Bring a good sleeping pad. A REALLY good sleeping pad.
Jake, above, is using (well, half using) an Exped Sim Comfort 10 LW, which I highly recommend if you’re not packing it into the backcountry.
If you need to haul it (snowshoeing, skiing, backpacking, go with an Exped Downmat 7 or even the Downmat 9).
An insulated pad insulates you against the cold snow underneath, where even the best sleeping bag won’t offer much protection – once you lie down in the bag and compress the insulation underneath you (be it down or synthetic), it offers little insulating value. So a high quality insulated pad makes a huge difference. You want it to be about an inch or more thick.
Although it’s not generally needed with a high quality sleeping pad like this, I often like to throw a hard cell foam pad under the inflatable. It adds a little extra insulation, but mostly a little protection against a leak or anything. It’ll definitely add to the life of your sleeping pad. Unlike Jake, above, don’t slide off the sleeping pad. You’ll get cold. 🥶
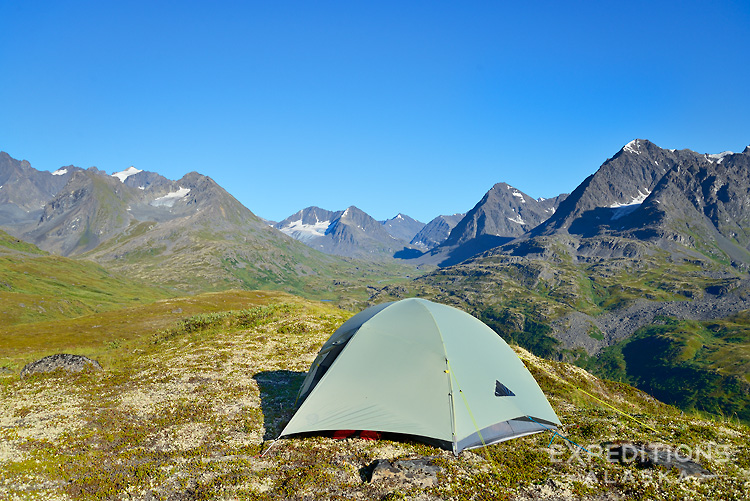
My backpacking tent, the Mountain Hardwear Skyledge 2 DP ultralight tent, sitting high on a ridge in the Chugach Mountains on our Bremner Mines to Tebay Lakes trek, in Wrangell-St. Elias National Park, last summer. This tent LOVES this place!
Well, one more reason its because it’s been upgraded, modified and changed, twice now in fact, so I thought I’d touch on a couple of things about the newer version of this tent, the Skyledge 2 DP.
Firstly, it has a new name. The DP is short for ‘Dry Pitch’. Meaning it’s possible to set the rainfly section of the tent up first, and then add the inner part of the tent afterward; a handy feature in the rain, for sure.
The Mountain Hardwear bio reads“DryPitch™ fly-first pitching lets you set up the tent in the rain and stay dry”, which I think is a little misleading. You will still get wet. The inner part of your tent will stay somewhat drier .. but rarely will it remain completely dry. Still, it’s a handy feature that I’m glad to see Mountain Hardwear working on.
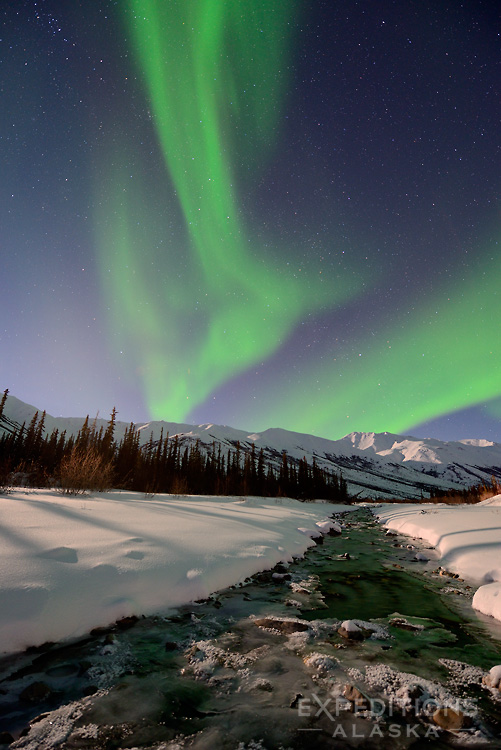
The northern lights rising over a small creek, with the Brooks Range mountains in the background, part of Gates of the Arctic National Park and Preserve, Alaska. Please click on the image above to view a larger version of this photo.
Hey Folks
I am just now back from a trip to the arctic looking for the northern lights; 4 of us went north of Fairbanks, to the Brooks Range, and spent a dark, cold week rambling around the mountains, enjoying what is ordinarily an incredible place; in the winter, a unique and somewhat amazing experience.
The northern lights are always challenging to photograph. Fortunately, they dropped by for a visit each night; we were indeed fortunate. We had cloudy skies for part of just one night, and all the moonlight anyone might ever hope for to light up the foregrounds. In the arctic, the moon doesn’t really pass ‘overhead’, but circles around the sky, so though it’s not high in the sky, it stays out for quite a while.
We were also lucky with the weather; there was just enough wind around (particularly higher in the mountains) to keep things from getting too cold. Weird, huh?
Wind (generally) keeps things warmer in the winter. On our final day, there was not the slightest breath of air, and the temperature dropped a lot .. hitting minus 40 right as we departed for the drive south. For the duration of our trip it had been (mostly) in the 0 to minus 20 range; Fahrenheit, of course).
Photography in the cold, at night, can be a challenge, but we were all well prepared, and managed to make some keeper images. I’ll write another post later about tips and ideas to alleviate some of the problems folks run into in such conditions. For now, I gotta catch up on some sleep.
Backpacking the Southern Traverse in Wrangell-St. Elias
I’ve been guiding backpacking trips in Wrangell-St. Elias National Park since 2002. We lead more backpacking trips here than anywhere else, and for good reason. Six million acres of glaciers, mountains, and valleys with almost no trails and fewer visitors than most people can believe. But if you asked me to name one route that captures what backpacking in Wrangell-St. Elias is really about, I’d pick the Southern Traverse every time.
Bremner Mines to Tebay Lakes. Roughly 10 to 12 days in the backcountry. Through the heart of the Chugach Range. No trails. No other people. Some of the best campsites I’ve seen anywhere.
It’s almost 20 years since we first guided this trip, and I’m still yet to see another person on the route ever. That’s pretty special.
The Southern Traverse may just be my favorite hike in the world.
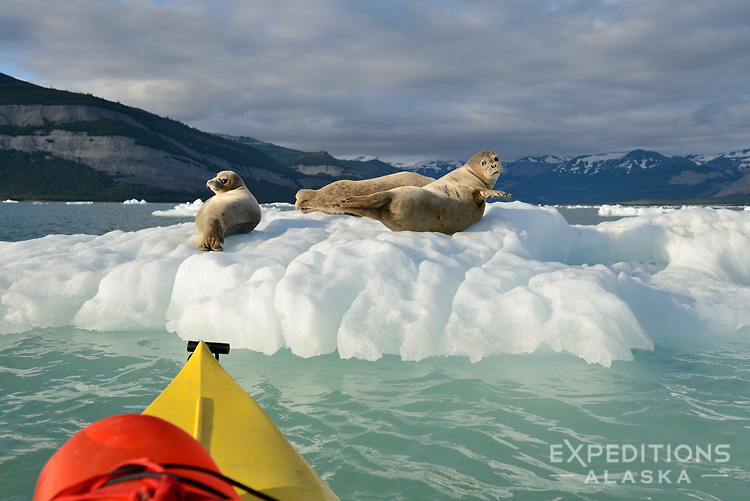
A slow, careful approach allowed us to get up close and personal with these Harbor Seals on our Sea Kayaking trip.
Hey Folks,
Another photo from our July sea kayaking trip to Icy Bay. After a great day paddling across the bay, hiking along the edge of the Karr Hills and taking a close look at the Yahtse Glacier, we paddled back toward camp and found Harbor seals .. lots of Harbor Seals.
There are an estimated 3500 harbor seals in Icy Bay, and we saw plenty this afternoon.
It seemed like every other ice floe had a small family of seals lazing upon it, resting on the ice in the sun. Though many of them are somewhat skittish, because they’re so NOT used to human visitors, we had our share of seals that allowed us a closer look. Using the kind of approach that I recommend in my wildlife photography tutorial, we were able to approach pretty closely without disturbing them. If we moved slowly or not at all and just drifted quietly along, they didn’t seem to be too alarmed.
Harbor seals can be pretty skittish in areas where they’re hunted. We just had to let the sea kayaks drift and stay still, and quiet, and and did our best not to disturb them. Eventually they’d settle down and we all got some nice photos.
One interesting aspect of the wildlife ecology here is the prevalence of Harbor seals yet complete absence of orcas, a major predator of the seals. I’ve never heard of anyone, ever, seeing an Orca in Icy Bay; for some reason they just don’t come into the area. As a result, the seals are abundant, and somewhat casual, less wary than they can be elsewhere.
I’m not sure whether orcas avoid Icy Bay because of the shallow entrance to the bay or because of how cold the water is up in the north end of the bay or quite what it is.
I shot a few video clips of the seals on the icebergs, as well as a number of still photos, as well. It really helps to have such relatively calm waters to sea kayak in when photographing, and Icy Bay is great in that regard. Even though some times its windy here, generally the water is reasonably calm and protected; great sea kayaking.
If you’re reading this and enjoy sea kayaking, I highly recommend you browse our sea kayaking tutorial; lots of great info and instruction and tips to help you plan a trip.
Heading off for a Brown Bear Photo Tour soon; I’ll maybe catch some more harbor seal photos on that trip, as we’ll be along the Katmai Coast. Big fun!
On our Bremner Mines to Iceberg Lake trek, Amy and Cindy take a quick break before we ventured down to the glacier. Photo taken with Nikon Coolpix L22.
Hey Folks,
Just editing some of my files from this past summer, and I ran across this picture from our August Iceberg to Bremner Mines trek in Wrangell-St. Elias National Park. I shot this photo with my little Nikon pocket camera, a Nikon Coolpix L22. I started carrying a point and shoot (P&S) this summer, for the first time in I don’t know how long; too long!
It’s definitely nice to have something handy and accessible, without trying to deal with a larger SLR hanging from a strap while hiking. I generally carry my SLR or SLRs inside my backpack, stashed away where they won’t get (a) damaged and/or (b) left behind quite so easily. It’s SO easy while backpacking to stop and take a quick break, put something down, and walk off without it. That sucks when it’s a can of bear spray or a Nalgene, but it REALLY sucks when it’s something like an SLR, and insanely expensive.
So this summer I hiked with a trusty little Nikon Coolpix L22 in my shirt pocket – the perfect size for a P&S camera. I miss the image quality, of course, when I get home to view the images, but I mostly miss the functionality of the camera in the field. This could well be simply because I’m not as familiar with that camera as I should be, and so I just “point and shoot”, rather than fussing with trying to make some kind of manual controls. There were a few times when I really thought “man, I wish this camera would let me do x-y-z” – which of course I could easily have done if I’d had the SLR in my hands.
Hiking boots are one of those subjects that are SO subjective that it’s invariably a much lengthier conversation than a blog post might, or should, be. Different boots fit different people well, and different boots fit different situations differently.
I can suggest what works well for me, in situation x-y-z, and that pair of boots might be completely inappropriate for you in the same situation. or, they might be completely inappropriate for me in situation a-b-c.
So it’s extremely difficult to try to write a ‘general’ idea about boots. I’ll give it a shot.
Choosing the Right Boot Material
Leather vs synthetic.
The biggest question most start with is “leather boots versus synthetic”.
Full Leather Boots
Full leather boots will typically tend to be more durable, provide a little better ankle support (though I have doubts about how much), be heavier and more expensive. If you backpack off-trail a lot, carrying a heavy load, and want a pair of boots that will last a long time, my suggestion is a leather pair of boots. But, if you hike mostly on trail, don’t carry a big heavy pack very often, and don’t mind replacing your boots more frequently, synthetic boots are often a good choice.